People seem to fear the idea of tension assembly in their sewing machines. Adjusting can be hard for some people, but we are here to make it easier for you.
Go through this guide to build a clear understanding for tension assembly, so you know how to replace this assembly like an expert.
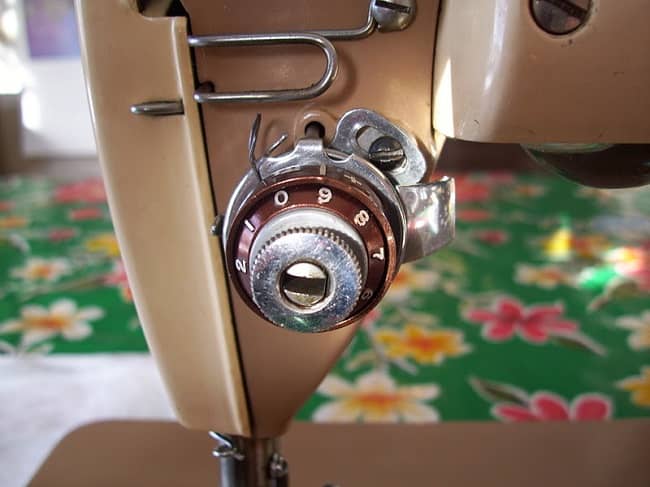
Demystifying Tension Assembly
Among all the parts of your sewing machine, there are two parts called tension discs and tension regulators. These two parts are together called tension assembly. Tension discs tug the thread from the top, and the tension regulator controls the pressure in the tension discs.
In the older sewing machine, there’re two tension discs, and in the modern sewing machine, there’re three tension discs, and it can work with two threads at a time.
When it’s a problem with the tension assembly, people generally have to replace the take-up spring. Replacing the whole post of tension is truly rare. Still, we will give you details on replacing the whole post of the tension assembly at the end of this guide. Now, let’s break down the total process from dissembling and reassembling the tension disc in order to replace the take-up spring.
When Does It Require Replacement?
The part that gets damaged mostly in the tension assembly is the take-up spring. It’s a hook that your machine has in the tension discs, and your guide the thread through it. When you wrap the thread inappropriately around it, it tends to get yanked. That causes the spring to get twisted from the position in the discs or breaks it off.
In this case, you might need to replace the take-up spring. That means you need a new take-up spring to replace the tension assembly. When you buy a new take-up spring, you can start with the steps below.
How to Replace the Take-Up Spring
Step 1
First, you need to pull the decorative knob off from the tension discs. It will come out easily; you don’t need to put too much energy to take it out.
Step 2
You will see another smaller knob under the first knob that you just took off. Spin it anticlockwise to take it off as well.
Step 3
After removing the smaller knob, you will see a wide spring around the post that is holding the whole tension discs. Now, take out the spring too. Keep all the collected parts aside carefully, and don’t lose them.
Step 4
When you take down the spring, you will find see something that looks like a miniature bowl. Now, take that out from the post of tension discs.
Step 5
After the removal of the miniature bowl, behind that, you will find the curved discs, which we call tension discs.
You will find them set by their opposite side. They are not facing each other; they are actually set by their backs. However, now take them off and keep them aside.
Step 5
After the tension discs, there will be a plate with some notches. Take the plate out. If you take a close look, you will see a keyhole in the center of the plate.
The post of the tension discs should be completely empty of all the parts by now except the take-up spring.
Step 6
After all the parts, you should reach the take-up spring now. Take it out; by this, you just disassembled all the parts of tension discs.
Step 7
Look at the take-up spring; you will notice a pip on it. Then take a look inside the core of the tension assembly. You will need some gear-like setup inside it.
Step 8
We will start assembling again; in other words, you replace the tension assembly. And we will start from the take-up spring now. Grab the new take-up spring and put it inside the gear-like setup of the tension assembly post.
Well, you can’t just put it in any way; you need to place it in a way, so the hook of the spring is right on the 6 o’clock position.
Step 9
Now, move the hook of the take-up spring clockwise. You need to move it all the way up; you should hold it in the middle position from the up and downside of the tension assembly post. Keep holding the hook; they direct you until you put it back in the next part of the tension assembly.
Step 10
The next that you will take is the washer or the plate we mention in step 5; it has a keyhole in the middle. Once it is set it back in, you can leave the hook; because the washer is the part in the tension assembly that holds the hook and makes it bounce up and down.
Step 11
Now, it’s time for the tension discs to go back in. Make sure you place the way you found them when you dissembled them in the first place.
Again, this means you place them by their back, not face-to-face.
Step 12
There’s a bowl above the tension discs. Take that now, and put it back in the post of tension assembly.
Step 13
Take the wide spring, and place it back in the post.
Step 14
Now, take the smaller knob or the tension nut, and pin it in. For the tension nut, now, you need to twist it clockwise. When you see the post, if coming out little, you can stop twisting the tension nut.
Step 15
Finally, you can put back the decorative know/cover of the tension assembly that stays at the top. You need to gently push it in, and it will be set easily.
Final Words
Sometimes you might need to replace the entire tension assembly post, yet that’s rare. But keep this in your knowledge, there’s a screw by the side of the sewing machine. To replace the whole tension assembly post, take out those screws. If you pull the complete post, comes out intact. This is all you need to do to replace a tension assembly.
Related Posts:
- How To Replace A Foot Shank On A Necchi Sewing Machine
- How to Do Monogramming With Sewing Machine
- How To Hem Curtains With A Sewing Machine