So you have everything set to begin sewing: a sewing machine and several fabrics. You have even bought or downloaded a pattern for something you want to create. However, you realize that the pattern symbols look very foreign to you.
Suddenly, you are not yet ready to begin sewing. Do not worry. These symbols are pretty standard in the sewing industry, meaning that once you learn them, you can use any sewing pattern. To understand them, you need to learn some of the most common and basic patterns.
These are explained below.
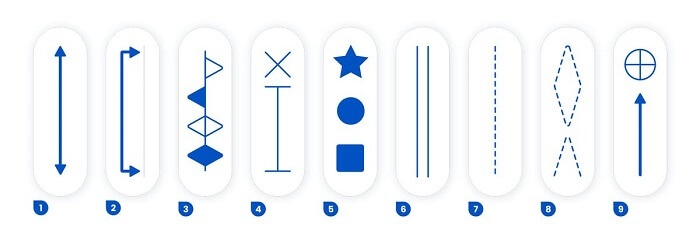
Stitching lines
The stitching line is usually in the form of a thin, broken line (short dashes). It indicates the exact line should be sewn on. Even though most patterns are transferred into the fabric you are working on; it is not recommended to transfer these dashes into the garment you want to work on because it would result in excess handling.
Grain lines
Grain lines are very important because they help you create a strong and well-constructed final design. They are usually in the form of double-ended arrows and should be aligned with the fabric’s grain direction.
However, to use it in the right way, you need to understand how fabrics are weaved. Fabrics are usually made of interwoven threads. The threads running lengthwise (warp) are generally stronger than the threads running perpendicular to the warp (weft). Warp threads usually stand out on fabrics and, thus, are very easy to spot.
The grainline means that the garment should be aligned with the warp threads being parallel to the double-ended arrow before moving forward to stitching.
Fold lines
This symbol closely resembles the grainline, but the double-ended arrow bends on each side and runs parallel to a thick line. It is mostly used to show the back of garments like jackets and shirts, which close at the front side.
The whole piece is only half of the garment, and the thick line indicates the edge of the garment that should be aligned with the fabric being folded. When folded to the other side, it completes the other symmetrical side, creating a proportional piece.
Notches
Almost all sewing patterns usually have triangular or multiple triangular marks. They are marked while sticking out of stitching lines and are used to show fabrics that must be matched at those specific notches. The matched parts should then be stitched with careful consideration to match those points to create a continuous and perfectly aligned fabric.
Darts
Darts are usually long and narrow triangular symbols with a series of dashes to show stitching lines and areas to fold around the stitch. The symbol also shows exactly where the fabric should curve so that you do not build oversized or out-of-shape creations. It is used to create things such as pockets and pleats because of its folding characteristics.
As the name suggests, this symbol is used to indicate where to stitch your buttons and buttonhole markings. The symbol itself is an X on one end of a line with T ends. The cross indicates the button marking while the line indicates the buttonhole marking. The two should be sewn on opposite sides of the fabric.
Conclusion
These are the most commonly used sewing pattern symbols. Of course, there are more symbols, but after understanding these markings, it should be quite easy to decode the rest if you follow the same school of thought.
The good thing is that the internet is available for looking up any symbol that you cannot decode, and therefore, you cannot get stuck.