 If you didn’t know that, now you know! You need to follow some steps to attach a button to a garment.
Also, let us make you aware of one thing; all buttons don’t contain a hole on the top side. Sometimes the holes can be from the sides.
So, if you have buttons that have holes on the top of them, then follow this guide to machine sew them.
Supplies
Other than buttons and fabric, you need desk tape, open-toe presser foot, scissors, needles, and thread to add a button with a sewing machine.
Sewing Process
If you want, you can practice attaching some buttons to a spare piece of fabric. You will get hold of it if you practice adding some buttons on some other fabric pieces. This way, when you go for adding buttons on the main fabric, you will be able to do it properly. However, let’s walk you through the process now –
Step 1
Take a button and put it on the area of the fabric you want it to be. After that, you need to use desk tape to secure the button on the fabric. One piece of tape might not always work on every fabric; feel free to use as many tapes as necessary.
Step 2
Set your machine beforehand with the stitching process. Add the open toe presser foot on the machine, and set the zigzag stitching style; you will need a straight style after that. First, you will need to stitch the button couple of times with a zigzag stitch, and then you can apply some straight stitches. Also, don’t forget to thread the machine. The color of the thread is up to you, but still, we recommend you go for the colors that match the buttons.
Tip 1
Once you set the machine and secure the button on the fabric properly, you can proceed to sew. Now, the button you have on the fabric can have more than two buttons. Anyway, you can start from one of the holes of the button.
Tip 2
Before you put the needle in, lower the feed-dogs because your buttons don’t need to move forward! You want them in the place you kept them. If you don’t have the function of lowering the feed dogs, you can simply put a flat rubber to cover them; they are readily available in the stores. Also, if you don’t have the feature of selecting a stitching style, you can use go slow with the stitching process.
Step 3
Anyway, you can now set a hole of the button right under the needle. Now, hand-crank the machine and lower the needle right through the target hole. You need to make sure the needle it’s not just in the hole; it has gone all the way down the fabric.
Step 4
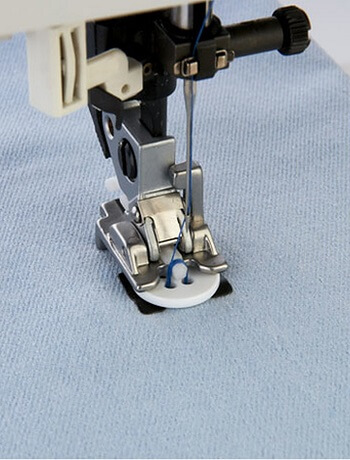
After that, you need to lower the presser foot. We have suggested using an open-toe foot because this sort of foot allows you to see the holes in the button clearly. If you compare the foot with the other foot, you will see the difference in their toe gap.
Step 5
Now, hand-crank the machine again, to take the needle out of the fabric and button. You can move the fabric under the needle to reach all the holes in the button. Make sure not you are hitting the button; if it does, it can break the needle and button both. Also, you could get hurt in the process.
Step 6
Go through all the holes by the needle several times to secure the button with thread. You can figure out the width by now once you stitch the button with the first layer of thread. Then, follow the width and go over all the holes of the button. Buttons look better when the thread is bulky on them. You can run the machine until the thread is bulky enough to make them look good on a garment.
So, this is how the machine sews buttons. If you are happy with the first attempt, then it great! If you are not happy, you can always practice. There’s nothing is be sad about; it’s all for exploring and learning amazing stuff with your nifty sewing machine.
Final Words
We strongly suggest you do a little practice on some spare fabric before you go for the main garment. Also, you might not have all the necessary features that we have mentioned in the sewing machine, or you could have all features as well.
Make sure you are going slowly while machine sewing buttons because that way, you have more control over the stitching process. Thus, you have less possibility of getting into accidents or breaking the needle and buttons.