 There are several ways you can hem jeans. The method chiefly depends on the reason you are hemming a pair of jeans for.
Hemming jeans is a smart fixing plan, no matter what the reason is.
If you don’t own a sewing machine or can’t get to a tailor to seek help, then read this article.
You will mainly learn how to hem jeans by your hand with the help of a few other supplies.
Besides, you will get to know the other correlative details about hemming jeans.
What Does Hemming a Jeans Mean?
The very ends of your jeans are known as hems. You either need to make new hems for your jeans or readjust the preexisting ones. This process of readjusting or remaking the edges of your pants is called hemming from the standpoint of sewing.
Why Do you Need to Hem Jeans?
Your favorite pair of jeans can wear out by the border through prolonged use. To fix the worn-out borders, you can hem the jeans.
As professionals do it, they don’t always throw the old hems of jeans away in the process of shortening them. They patch them up with the end of the jeans by performing some cutting and adjusting activities.
Also, you might not find jeans relating to your height. In that case, you need to adjust the length of your new jeans by stitching jeans inward.
Hems can get tattered as well by time. Then, you will need to discard the old hems and make new hems for the edges of your jeans.
Furthermore, some of us wear jeans without hems these days as a new trend. But, the style doesn’t necessarily suit all kinds of jeans. Also, all of us don’t have the same taste in style, do we?
Accessories for Hemming
You will need a pair of sharp scissors, measurement tape, ruler, pins, thread, needle, chalk, and iron machine to execute the following methods for hemming a pair of jeans by your hands.
First method: Readjusting the old hems
If you need to shorten a pair of jeans or fix a frayed portion just on the top of the hems of your jeans, then follow this method. And, if the issue is to completely replace the old hems, then jump onto the next method.
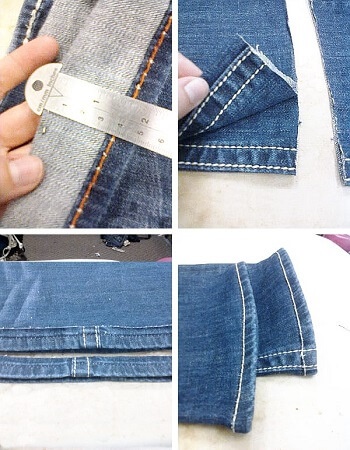
Step 1: Pick the length
Take a measurement tape. Next, decide the length of your jeans where you exactly want to stitch the old hems. Now, mark your preferred length with chalk.
Step 2: Fold and pin
After marking the length, fold the jeans from the end up to the mark. You need to crease the fold to make sure it’s on the correct length. Now, gently pin the cuff you have created at the end of the leg. Do it carefully, so you don’t mess up the length.
Now, you need to measure the length of the folded leg to cuff the other one. And, pin the other leg the same way.
Tip: Don’t try to fold and pin the other leg by keeping the folded leg on top of it. It’s a rookie mistake that people frequently make. You will end up with different lengths on both legs. Try to do professionally as we direct.
Step 3: Sewing time
Once both legs are cuffed, you need to sew them cautiously. There are pins, don’t get pricked by them.
When you are done sewing, fold the new edges inside. Finally, iron the edges to keep it in place. There you go with your new hems!
This technique is useful in another way. As you won’t be cutting your jeans, you could unstitch the borders any time you want.
Second method: Creating a new hem
You can make use of this method if the hems of your jeans are worn out or you simply want to replace them. Remember, you need to pick a needle that is a little thicker to go through your jeans.
Step 1: Cut the old hems
Cut the hems with a pair of sharp scissors. Now, take the inside out of your jeans. Then, take one leg of the jeans, and with a ruler, mark the edge.
Here, you will have to mark and draw 2-3 equal lines with the same width. Then, you fold them layer by layer to make hems with the right thickness. Otherwise, the hems will lack girth. And, if you don’t make the hem bulky enough, your jeans aren’t going to look as good as before.
Repeat the same process on the other leg.
Step 2: Mark, fold & stitch
Now, fold the marked lines one by one, and sew them together. The borders are relatively thick at this stage. So, carefully push the needle and sew through the whole circumference of both legs. Finally, give the new edges a good press with an iron machine.
How to Hem Flared Jeans?
You know that flared jeans have wider ends in comparison with the other parts of jeans. Follow the steps below to hem flared jeans by hand.
Step 1: Separate the hems
Take a pair of scissors and cut the existing hems from your jeans.
Step 2: Fold and stitch
Now, mark and pin the borders by 2-3 lines like the previous method that we employed for plain jeans. After that, sew the layers and press them with an iron machine.
The disadvantage of hemming a pair of flared jeans is you will be permanently cutting the jeans. Therefore, you have no option to get the real length back. Also, you can’t even readjust the hems like plain jeans because, as we know, the measurements of flared jeans widely vary from top to bottom.
Conclusion
You could have jeans that needed to be fixed in length. The jeans may be frayed right above the hems or, maybe, your jeans need new hems. Interestingly enough, you could have all three issues at the same time!
Anyway, whatever the issue that you have with your jeans, this comprehensive guide of ours to hem jeans with hand will help you to fix your jeans skillfully. You have no reason to be upset about it. You can follow our lead, wear your jeans, and look dapper in them.